Malware is every website owner’s nightmare. Whether it’s strange redirects, a sudden drop in traffic, or a warning from Google, malicious code can wreak havoc on your WordPress site. Fortunately, if you’ve installed the Wordfence Security plugin, you’re already a step ahead in defending and disinfecting your site.
In this article, we’ll walk you through how to remove malware using Wordfence, explain why this plugin is trusted by millions, and offer tips to prevent future infections. Let’s dive in.
Why Wordfence Is Your Best Ally Against Malware
Wordfence is one of the most popular and powerful WordPress security plugins, boasting a robust firewall, real-time threat defense feed, and malware scanner. It’s trusted by over 4 million websites worldwide, and for good reason:
- Comprehensive scanning of core files, themes, and plugins
- Real-time alerts for suspicious activity
- Easy cleanup for known malware patterns
- Live traffic monitoring to spot malicious users
If you’re serious about protecting your website, Wordfence is a must-have.
Step-by-Step: How to Remove Malware with Wordfence Plugin
🔹 Step 1: Install and Activate Wordfence
If you haven’t already, install Wordfence from the WordPress plugin directory.
- Go to your WordPress dashboard.
- Navigate to Plugins > Add New.
- Search for “Wordfence Security”.
- Click Install Now, then Activate.

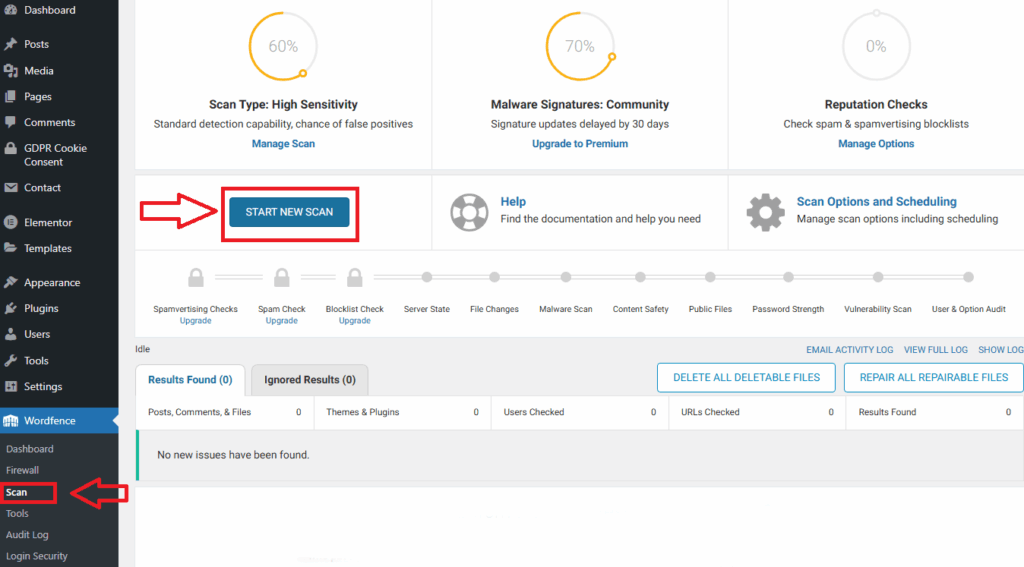
🔹 Step 2: Run a Full Malware Scan
- Go to Wordfence > Scan in your dashboard.
- Click Start New Scan.
- Let the scan run. It may take several minutes depending on your site size.
Wordfence will check for:
- Malware signatures
- Backdoors
- SEO spam
- Suspicious code in themes or plugins
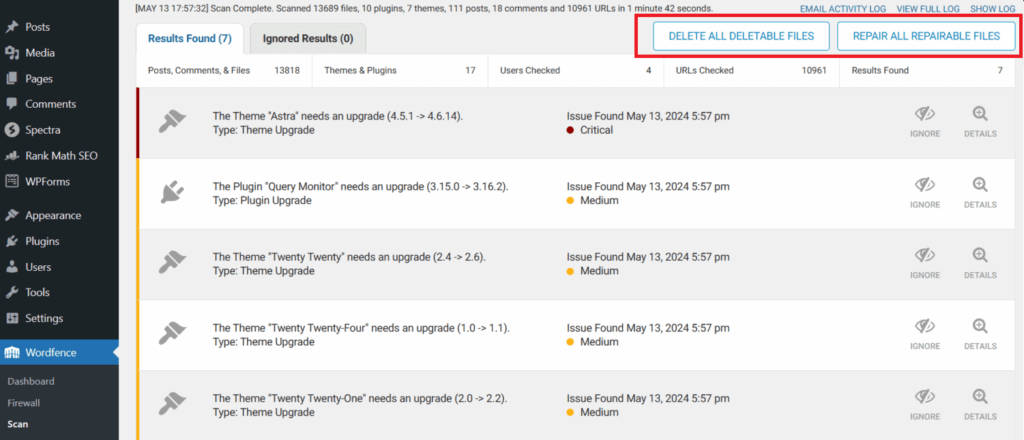
🔹 Step 3: Analyze the Scan Results
Once the scan is complete, Wordfence will show a list of issues. Look for entries marked as:
- Critical Threats
- High Severity Issues
Each result will offer detailed explanations and recommended actions.
🔹 Step 4: Clean the Infected Files
You have two options:
- Automatically Repair Files: If Wordfence finds a compromised core, plugin, or theme file, click “Repair” to restore it using the original version from the WordPress repository.
- Manually Delete or Replace: For custom or premium files, back them up and replace the infected files with clean versions from your developer or plugin source.
Pro Tip: If you’re unsure, use the “View File” option to inspect the code. Watch out for obfuscated PHP or unfamiliar base64 encoding — classic signs of malware.
🔹 Step 5: Block Malicious IPs and Users
Go to Wordfence > Tools > Live Traffic to identify suspicious IP addresses and bots. You can block IPs directly from this screen and prevent further access.
Optional: Upgrade to Wordfence Premium
While the free version is powerful, Wordfence Premium adds essential features like:
- Real-time firewall rule updates
- Country blocking
- Scheduled scans
- Real-time IP blacklist
This is especially useful for high-traffic or business websites that can’t afford downtime.
Best Practices to Prevent Future Malware Attacks
Even after removing malware, keeping your site clean is an ongoing effort. Here are some essential tips:
- ✅ Keep WordPress, plugins, and themes up to date
- ✅ Use strong passwords and limit admin access
- ✅ Enable two-factor authentication
- ✅ Schedule regular Wordfence scans
- ✅ Install plugins and themes only from trusted sources
Final Thoughts
Removing malware from your WordPress site doesn’t have to be a nightmare. With Wordfence, even non-tech-savvy users can detect, clean, and secure their sites in a few clicks. Don’t wait for a security breach — take action now to protect your digital presence.
Install Wordfence today, and rest easy knowing your website is in safe hands.
Ready for a Safer, Faster Website?
Combine the power of Wordfence with our secure WordPress hosting for unbeatable performance and protection. 👉 Explore Our Hosting Plans